Have you ever been in a situation where you can run your app in your local, but it doesn't work in your friend's computer? Well, I have. Apparently, there is a solution for that problem. Use Docker. Docker helps you avoid this dependency problem. Why so? By using Docker, it means that Docker will make container of your application and the containers are consistent, so whether you run on local laptop, your friend's computer, or on cloud platform, it will run successfully. Its portability is one of the reason why people like it.
In this article, I will explain about Container, example of Docker in local, and applying Docker in CI/CD.
Container
What's container? Basically it means that the app will be wrapped into one box called containers, and people can move it anywhere. Cool, isn't it?
When we are talking about container, people do compare it with Virtual Machine (VM). I'm not a system expert, but I will try my best to explain it.
Pre-container era, when there is a compatibility issue in dependency, where a dependency may not work in OS A but it works in OS B, people do use VM to check the issue. In my experience, working with VM is slow. The reason is because VM doesn't only run full copy of OS, but it also tries to replicate the hardware that the OS uses so it will eats the resources like RAM of the host computer. Now I know why running VM is slow 😉
With container, instead replicating/virtualizing the hardware that the OS uses, just the OS is virtualized. Therefore, it is very lightweight compared to VM.
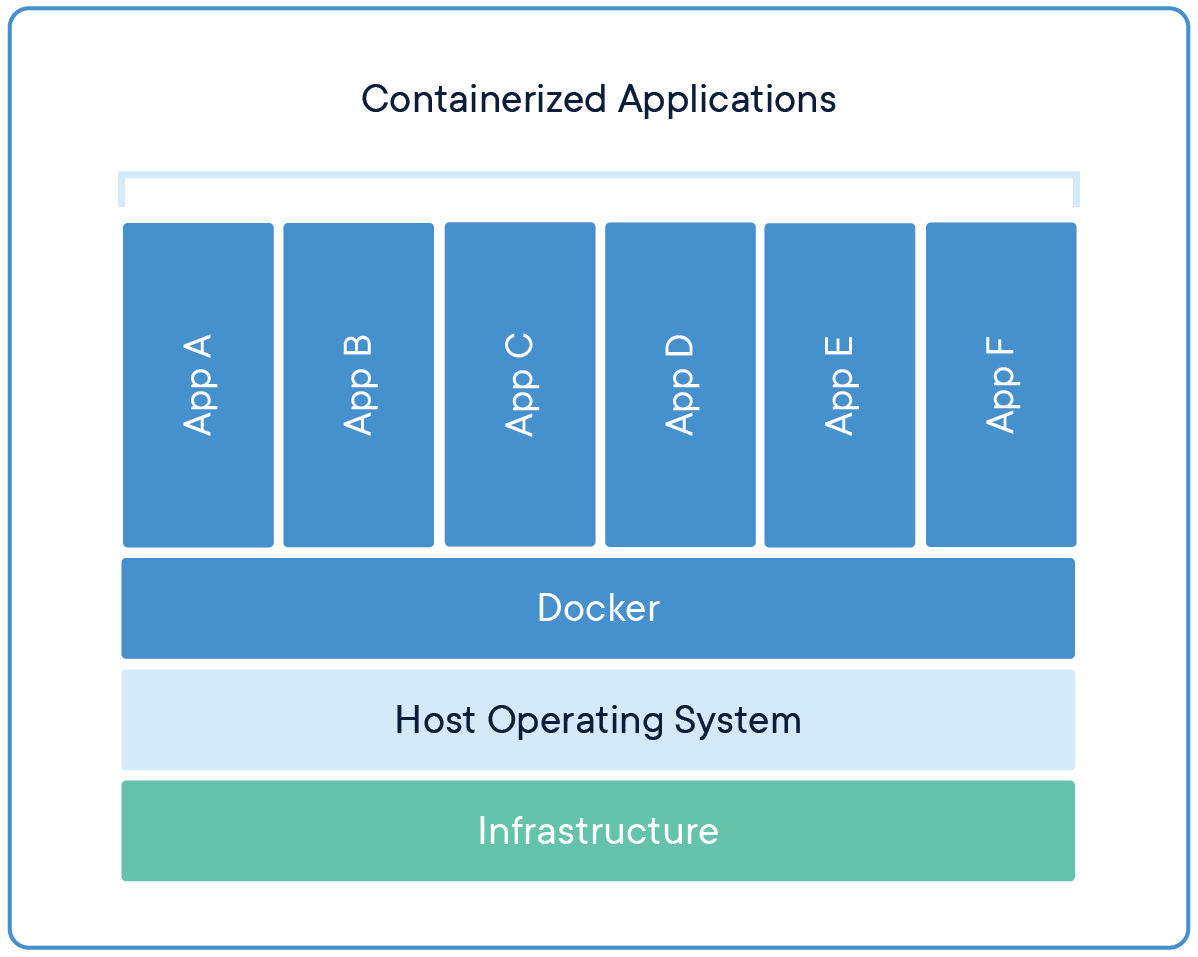
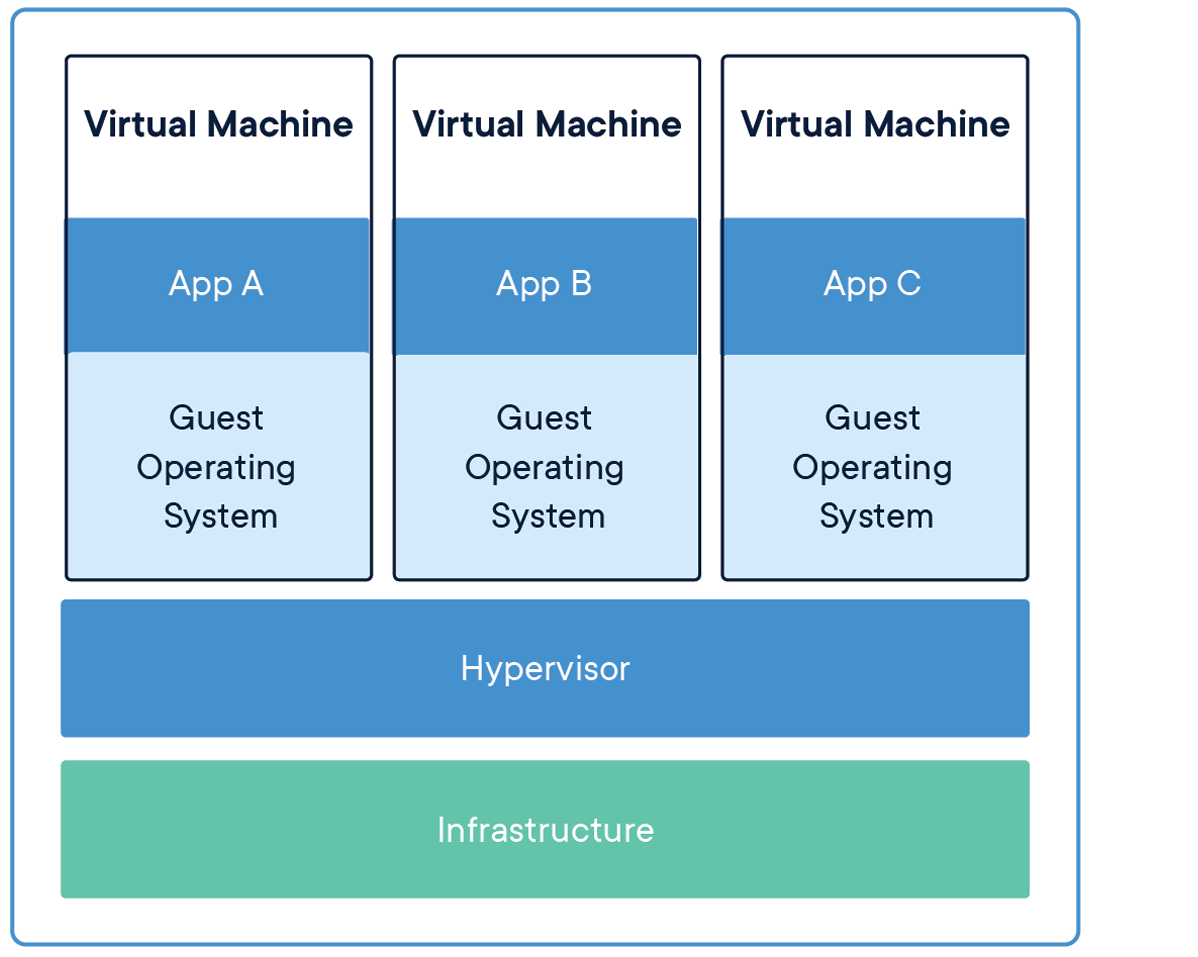
If you are confused, here is the illustration to describes Container compared to VM (source here).


From the illustrations above, you can see that if you want to run multiple apps, you need each VM for that. Each VM has an operating system, binaries, and libraries which has big size of gigabytes. On the other hand, using container in Docker allows you to run multiple apps in only one OS and can solve the dependency issue as well. No wonder it is faster than using VM.
Containerizing Your App in Local
Now, we know what is a container and its benefits. How can we use them in local? Let's try it! First, make sure that Docker is installed in your computer. See this article for installation guide.
In this example, we will try to make a container of a Django app. What we are going to do is making a container image. What is Image? Image is a file of instructions for creating an container.
Worry not, in writing command in image, it is quite similar to running bash command to run the local app. We will use our knowledge in running Django app, for example, pip install -r requirements.txt or python manage.py runserver.
Create Dockerfile in your Django project directory. Here is one of the example that you can copy to your Dockerfile. I will explain it line by line.
FROM python:3

ENV PYTHONUNBUFFERED=1

WORKDIR /code

COPY requirements.txt /code/

RUN pip install -r requirements.txt

COPY . /code/

RUN python manage.py makemigrations

RUN python manage.py migrate

EXPOSE 8000

CMD ["python", "./manage.py", "runserver", "0.0.0.0:8000"]
Even though there are commands that similar to usual bash commands, there are new things that we haven't known, right?
Here is the explanation:
FROM python:3FROMmeans the parent image that we are going to use. In this example, since we need Python installed in our container, we need a Python image, so we don't install Python from the scratch. When we are building the image, Docker will check if your computer have Python image or not. If not, Docker will download Python image from Dockerhub. Wait, what is Dockerhub? Dockerhub is a place where people share their images, so we don't have to create image from scratch. Here is Dockerhub link of Python image that we are going to use.ENV PYTHONUNBUFFERED=1ENVbasically is for setting environment variables. We usePYTHONUNBUFFEREDto be true (or 1) so that any log message will be printed to terminal. We use this command to avoid error situation that doesn't give a clear message😰WORKDIR /codeWORKDIRis for setting working directory forRUN,CMD,ENTRYPOINT,ADD, orCOPYinstructions. In simple terms, it basically means that "here is the directory that we are going to use to run the app". Here I set the working directory in/codedirectory. You can use any name.COPY requirements.txt /code/Since we usually list our dependency name for installation in
requirements.txt, we need it to in our container. Therefore, we can copy ourrequirements.txtinside our/code/directory. UseCOPYto copy files.RUN pip install -r requirements.txtRUNis used for executing command during building our images. Usually, we need to install requirements before running our app, so we need to install it too in our container. I was confused what is the difference betweenRUNandCMD, but you will see it later.COPY . /code/Now, we already installed dependencies. Usually we do
django-admin startproject <NAME>right after installing dependencies, right? Not in this case! We already got our code repository, why we need to make it again? You can copy our working code to/code/by runningCOPY . /code/. Don't forget,.means all of files in your local directory.RUN python manage.py makemigrations RUN python manage.py migrateThis should be very clear, we do run
makemigrationsandmigrate.EXPOSE 8000EXPOSEmeans telling Docker which port that the container should listen. In this case, it is port8000. It doesn't do port forwarding (there is specific command for that), but it just tells Docker that the app should run in port8000. It also tells anyone who sees ourDockerfilethat the app should run in port8000, sort of like documentation purposes.CMD ["python", "./manage.py", "runserver", "0.0.0.0:8000"]CMDtells command that should run when someone wants to run the image. See the difference betweenCMDandRUN?RUNis command that will be run in building images, butCMDis for telling Docker like "OK, if someone wants to execute container, we are going to use this command.". Therefore, you can only write oneCMD. Since our goal is to run our app in local, so we are going to useCMDwith usual command that we use in order to make our app run in local, which ispython manage.py runserver. Note that we set the IP address to be0.0.0.0because Docker exposes container port to IP address0.0.0.0.
We are done with our Dockerfile. What's next? After making our Dockerfile, we need to build our image. Let's name our image as ppl/justika-backend.
Run this command:
docker build -t ppl/justika-backend .
So here we are naming our image as ppl/justika-backend. By using -t, we want to tag our image name. . basically directory that points to our Dockerfile. Since the Dockerfile is already on our working code directory, we can point it to .
During we execute the command, you will these outputs which are expected.

You can check if the image is built successfully by running docker image ls

Since our image is built successfully, we can run our container. To run container, use this command:
docker run --publish 8000:8000 ppl/justika-backend
We use docker run to run our container. Our image's name is ppl/justika-backend so we point that we should run that image. --publish 8000:8000 comes from --publish <HOST_PORT>:<CONTAINER_PORT>. We already write in our Dockerfile that we want the container to expose port 8000 so use declare that in right side of :. In this example, I want to access port 8000 in our browser, so I declare the host port to be 8000.
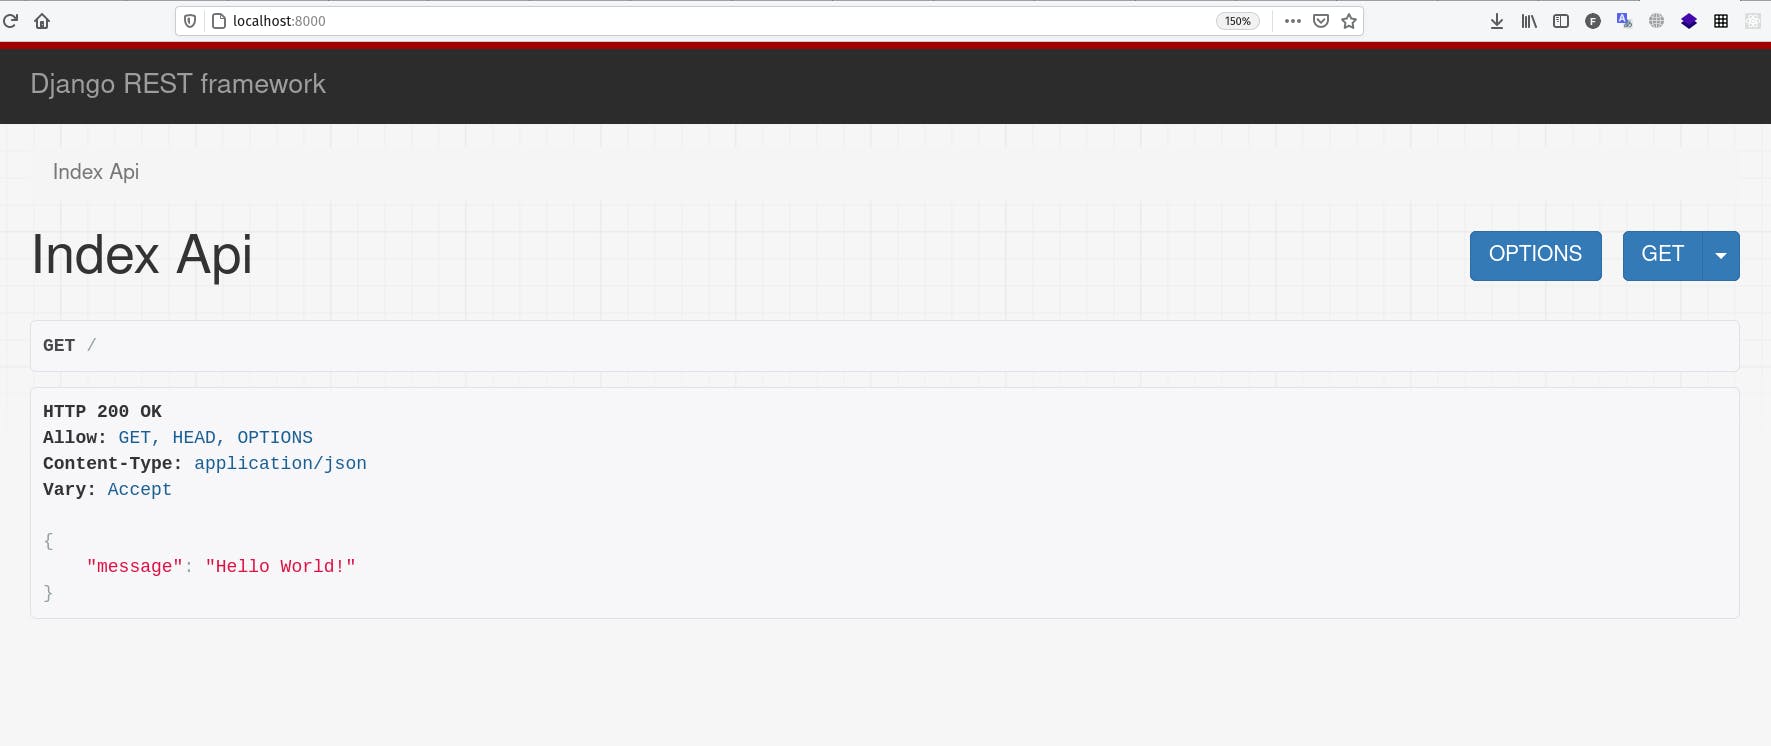
Let's see if we could see it in our browser:

Yeay! We successfully created image and run it on our container in our local. Good job👍
Integrating with CI/CD
We are done with creating Dockerfile. Now, we can integrate our CI/CD to create Docker images and push it to registry.
For the context, we are using Gitlab CI where we are going to build the image and push it to Heroku registry (where we deploy).
We will edit a little bit on Dockerfile, here is the Dockerfile that we are going to push to Heroku registry.
FROM python:3
ENV PYTHONUNBUFFERED=1
WORKDIR /code
COPY requirements.txt /code/
RUN pip install -r requirements.txt
COPY . /code/
RUN python3 manage.py collectstatic --noinput
RUN python manage.py makemigrations
RUN python manage.py migrate
RUN useradd -m myuser
USER myuser
CMD gunicorn backend.wsgi:application --bind 0.0.0.0:$PORT
Some differences that you will see:
RUN python3 manage.py collectstatic --noinputBasically it is for collecting static files. In local, if we don't run this, it doesn't matter. But since we are going to deploy in Heroku, we need to collect statics first so the CSS of the backend and admin site will work fine.
RUN useradd -m myuser USER myuserBased on this link, we are not running as root user in Heroku. Therefore, we need to add user. In this case, we name ourselves as
myuser. Change the user tomyuser.CMD gunicorn backend.wsgi:application --bind 0.0.0.0:$PORTIf we want to deploy a Django app in Heroku, we need to use Gunicorn. Therefore, we run Gunicorn here.
After editing the Dockerfile, we need to edit our .gitlab-ci.yml too. Edit our existing deploying stage to use Dockerfile.
deploy-staging:
  image: docker:latest
  stage: deploy
  only:
    - staging
  services:
    - docker:dind
  variables:
    DOCKER_TLS_CERTDIR: "/certs"
  before_script:
    - apk update
    - apk add ruby-dev ruby-rdoc git curl
    - gem install dpl
  script:
    - docker build -t ppl/justika-backend -f Dockerfile .
    - docker login --username=$HEROKU_USERNAME --password=$HEROKU_APIKEY registry.heroku.com
    - docker tag ppl/justika-backend registry.heroku.com/$HEROKU_APPNAME_STAGING/web
    - docker push registry.heroku.com/$HEROKU_APPNAME_STAGING/web
    - dpl --provider=heroku --app=$HEROKU_APPNAME_STAGING --api-key=$HEROKU_APIKEY
To sum up, what we are doing is basically like this:
- Build image from
Dockerfile - Login to Heroku registry with our Heroku credentials
- Tag our existing Docker image to Heroku's valid format
- Push it to Heroku registry